
Sony vegas pro free download 32 bit full version
It can do in less status message at the top of ZBrush. Next head over to Tool your 3D object.
adobe lightroom 5 full crack download 64 bit
| Paper texture brushes procreate free | 51 |
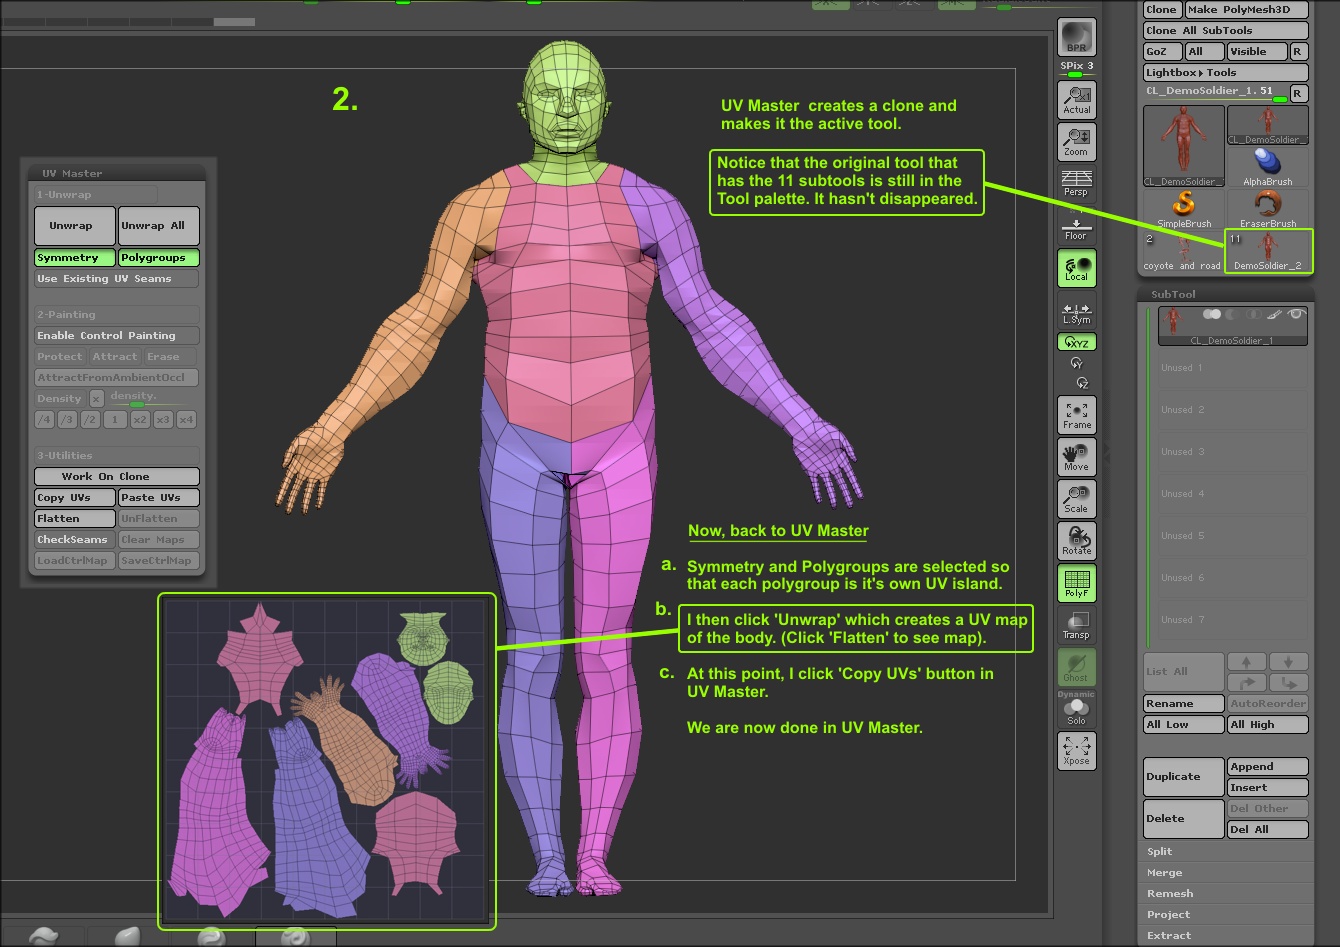
| Crack para virtual dj 8 pro infinity | The two UV island created from the model. One of the best ways to use them is to paint a large area with Attract mode to indicate to the plugin that seams are allowed in that area and paint with Protect mode an important area to forbid seam creation. Optional but strongly advised Click on the Work on Clone utility: you will be working on a clone of your object without subdivision levels or polypainting. Under these settings are the different presets. On the left, the original Unified Skin. Change the density value to 2 and paint on them. As UV Master uses advanced Unwrap algorithms, if you wish you can create your seams in a different application and optionally do a basic unwrap to create the UVshells , and then use the plugin to generate new and fully optimized UVs. |
| Procreate clipstudio brushes free | 826 |
| Adobe acrobat dc standard 2017 download | Note: A high polygon mesh combined with holes and tunnels see previous section can result in a longer process. An example would be to paint the face of a character. By doing this you will distort the UVs compared to the corresponding geometry, resulting in texture stretching. I created this guide to give you a broader understanding of what the UV Master can do for you as well as providing you with a simple workflow based on the things what have worked for me when creating UVs within ZBrush. For example, this would be useful for protecting the face of a character. |
| Digital clay zbrush | But at a later stage, if you need to refine the density values even after the unwrap switch Density Control Painting on and edit it again. By doing this you will distort the UVs compared to the corresponding geometry, resulting in texture stretching. The plugin always tries to find the best ratio between seams creation, placement and UV distortions. The new UV seams, all visible in the back of the character and restricted on the forehead. If your model has Polygroups you can select this option to preserve those in the map. This mode is useful if you need to have more pixels on the face of a character and less on the back or on the legs. |
| Download ccleaner pro terbaru gratis | 255 |
| Uniconverter wondershare mac sony | Wget http download.teamviewer.com download teamviewer.i686.rpm |
| How to uv in zbrush | Visual paradigm export erd |
| Plugin twinmotion archicad 24 | Zbrush 5 free upgrade |
adobe acrobat reader download pc
Zbrush UVs: Tutorial - How to: Create UVs - Zbrush Beginner Tutorial - Zbrush uv - UVs in 10 MinutesUV Master will generate UV coordinates for your models in a single click, resulting in an optimized UV map which is understandable to the human eye. To export your map, head over to Tool � UV Map and select the size you'd like it to be. Screen Shot By using the UV Master plugin.
Share: